Have you ever considered the intricate connection between various digital marketing services and how they profoundly influence websites? Digital marketing agency services are meticulously designed to be adaptable, scalable, and precisely targeted, to create a strong connection between your brand and prospective customers. This approach proves immensely effective in not only generating leads but also in establishing brand awareness and driving online product sales.
What is Tag Manager
Tag Manager is a tool for optimizing performance and improving user experience on your website. It allows you to effortlessly manage multiple tags and updates, which enables you to optimize your website’s performance and provide relevant content. With tag management, you can significantly reduce page load time and make updates to your website without having to worry about what’s happening behind the scenes.
Tag Manager is your website’s guardian angel, tirelessly working behind the scenes to keep everything in order. Imagine it as the organizer for your website’s little helpers called “tags.” These tags quietly observe what visitors do on your site and share vital insights. When someone takes action, like clicking a link or completing a form, these tags take note and send the info to your analytics tools. Think of tags as your website’s special agent that only activates when needed, providing the data you need to understand your audience and enhance your site effortlessly.
Google Tag Manager and key components:
Before we jump into the intricacies of tag management, we should know what the key components are:
Tags: The tags are also called action-initiators where they track all events on your website with the help of code or tracking pixels that are responsible for specific actions on your website. It is helpful in gathering user data, tracking conversions, or integrating third-party tools like Google Analytics, to custom JavaScript and HTML tags tailored to your unique needs.
Triggers: Triggers are the definitive event-definers in GTM where they establish the conditions under which tags should spring into action. A trigger can be as simple as loading a page, or a specific button click. Triggers ensure that tags only respond when the predefined criteria are met. They can be finely tuned with additional conditions, such as URL patterns or data layer variables, allowing for highly customized and dynamic behaviour.
Variables: It is the data gathered at GTM which captures dynamic information from your website and enables a more data-driven approach such as page URLs, click text, and form submission data. To make your tracking efforts more precise and data-driven you can then use these variables within tags and triggers.
Data Layer: The Data Layer is a structured data source that collects data from your website and passes that information on to Google Tag Manager enabling flexible and dynamic tracking implementation.
Version History: Relying on a version history can be a lifesaver when collaborating on projects or when you need to roll back to a previous configuration. With GTM you can maintain a comprehensive version history, allowing you to review, revert, and publish specific versions.
Folders: This in GTM helps you organize and manage your tags, triggers and variables. This becomes especially important as your container grows in size as it give you a way to keep things tidy and organized.
How to Set Up a Google Tag Manager Account
Setting up a GTM account is a fundamental step in enhancing your website’s analytics and marketing capabilities. It also allows seamless integration with various other tools and services, including Google Ads, Facebook Pixel, Google Analytics, HubSpot, and many more. Here’s a step-by-step guide on how to set up a GTM account and integrate it with Google Analytics:
1. Create a Google Tag Manager Account:
- Go to the Google Tag Manager website (https://tagmanager.google.com/).
- Sign in with your Google account or create one if you don’t have it.
- Click on the “Start for free” button to create a new GTM account.
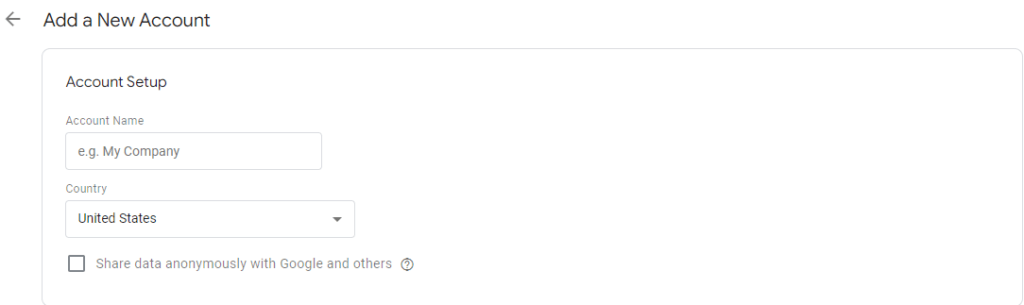
2. Set Up a Container:
- After creating an account, you’ll need to set up a “Container” for your website or application.

- You can create an account with two methods:
By adding the company name and choosing the country.
- Upon creating an account, set up a container. Choose “Web” as the target platform for websites.
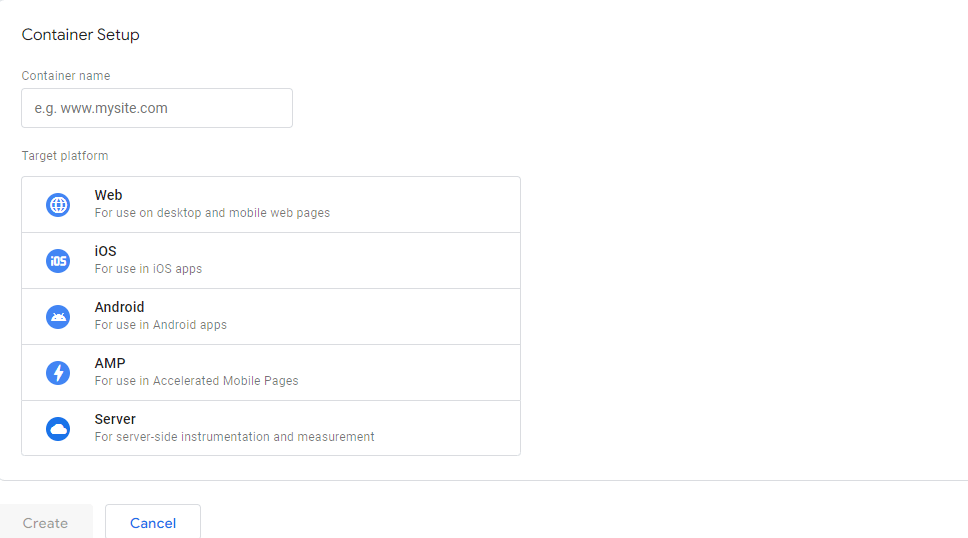
- Agree to the terms and conditions, and click “Create.”
3. Install the GTM Container on Your Website:
- Once your container is created, you’ll be presented with a container code snippet. Copy this code snippet and add to your website’s HTML code.
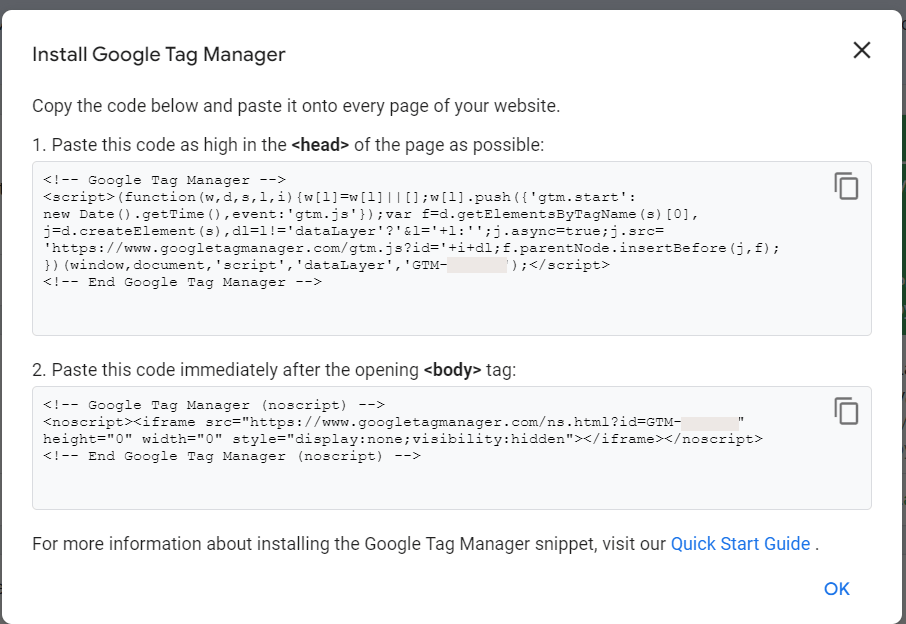
- Paste the code in <head> and <body> tag on every page of your website.
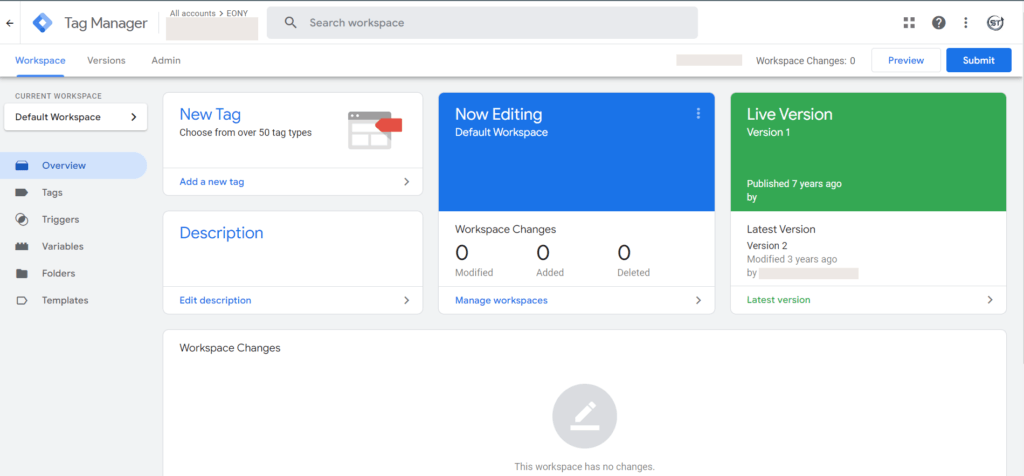
- The interface shows:
- Live Version which is currently active container
- Now Editing indicates when changes are in progress
- New Tags lists recently created tags
- Description provides details about tags, triggers, and variables
- Workspace Changes displays recent modification history
- Save and publish your website.
4. Integrate GTM with Google Analytics:
Create a Google Analytics Variable:
- Log in to your Google Tag Manager account.
- In the container workspace, click on “Variables” in the left sidebar.
- Click the “+ New” button to create a new variable.
- Name the variable (e.g., “Google Analytics Tracking ID”).
- Under “Variable Configuration,” select “Google Analytics Settings.”
Configure Google Analytics Settings:
- In the variable configuration, enter your Google Analytics Tracking ID. You can find this ID in your Google Analytics account.
- You also have an option to set other tracking options such as anonymize IP, cookie domain, and more.
- Click “Save” to save the variable.
Create a Google Analytics Tag:
- In the container workspace, click on “Tags” in the left sidebar.
- Click the “+ New” button to create a new tag.
- Name the tag (e.g., “Google Analytics Pageview”).
- Under “Tag Configuration,” select Google Analytics: GA4.
- Configure the tag with your Google Analytics tracking ID.
Set Up a Trigger:
- After configuring the Google Analytics tag, set up a trigger to determine when it should fire.
- Common triggers include “All Pages” to track pageviews or specific events based on user interactions.
- Click “Save” to save the Google Analytics tag.
Publish the Container:
- Click the “Submit” button in GTM to publish your container with the Google Analytics tag and trigger.
Test and Debug:
- Use GTM’s preview mode to test if the Google Analytics tag fires correctly on your website. Verify that data is being sent to Google Analytics as expected.
Benefits Using a Tag Manager
1. Simplified Tag Deployment:
A Tag Manager makes it easy for digital marketers and website administrators to add, update and remove tracking tags from a website. It simplifies the process of deploying new tags by instantly updating the code snippets on a site.
2. Reduced Dependency on Developers:
A tag manager is the best way for non-technical users to take control of their website’s tracking and marketing efforts. It allows them to make changes quickly, without needing to rely on developers.
3. Centralized Control:
With a Tag Manager, you can consolidate all tracking tags into a central interface that provides a holistic view of performance and organization. This makes it easy to update, manage, and report on every tag in one place. With the centralized control and testing capabilities of Tag Managers help ensure that tracking data is accurate and consistent.
4. Version Control and Rollbacks:
Tag Managers typically offer version control, enabling users to keep track of changes made to tags and triggers. If an issue arises, users can easily roll back to a previous working version.
5. Testing and Debugging:
Tag Managers provide tools for testing and debugging tags before they go live. This ensures that tags function correctly and that data is accurately collected.
6. Flexibility with Triggers:
Tags manager is flexible and works best for precise data collection and customization. The tags can be triggered to fire based on specific conditions, such as page views, clicks, form submissions, or custom events.
7. Improved Website Performance:
Tag Managers can load tags asynchronously, preventing them from blocking the loading of website content resulting in faster page load times and a better user experience.
8. Time and Cost Savings:
By reducing the need for manual code changes and developer involvement, Tag Managers save both time and development costs. Changes can be made swiftly within the Tag Manager interface.
9. Scalability:
Tag Managers can scale with your business whether you have a single website or manage multiple properties, these tools can accommodate your tracking and marketing needs.
10. Integration with Third-Party Tools:
Tag Managers seamlessly integrate with various third-party tools and services, including analytics platforms, advertising networks, and customer relationship management (CRM) systems allowing a more comprehensive view of user data and marketing efforts.
Wrapping Up
Tag Managers simplify the process of managing, maintaining and organizing your various tracking codes and scripts. By using a Tag Manager, you can reduce costs, empower non-technical users, enhance data accuracy and agility necessary to adapt to the ever-evolving digital landscape.