
A carefully crafted XML sitemap is vital for your website, assisting search engines in comprehending and efficiently indexing your web content. The sitemap lists all items on your site, such as images, pages, and feeds, allowing each page to be crawled by search engine spiders. While numerous tools are available to create an XML sitemap automatically, building one from scratch provides complete control over your sitemap’s structure. Here’s a step-by-step guide on how to construct an XML sitemap manually:
Plan Your Website Structure:
Before you start building your website, it’s crucial to map out its structure to determine which pages and content are essential to include. This might comprise your homepage, product pages, blog posts, and other substantial sections but could also include things like menus, navigation bars, or footers. The structure will make it simpler to determine which parts of your site are essential. For example, your homepage should be a simple-to-navigate dashboard highlighting all your site’s main content.
Create a List of URLs:
Start by creating a list of all the pages you want to include on your sitemap. This should encompass all key pages and sections of your website, including the homepage and subpages, form fields, and even landing pages that lead to further information.
Understand the XML Sitemap Structure:
An XML sitemap provides search engines with a specific structure for organizing and ordering your pages. This structured information helps search engines identify and index every page on your site, ensuring that users can easily explore your content.
Start Building Your XML Sitemap:
To get started, open a text editor or XML editor. You can create the basic structure of your XML sitemap by defining headings and subheadings with elements such as <url>, <loc>, and <lastmod>, each representing different parts of your site.
Add URL Entries:
For each URL on your list, insert an entry into your XML document following this structure:
- <loc>: Replace “URL of the Page” with the actual URL.
- <lastmod>: Insert the last modification date in YYYY-MM-DD format (if available).
- <changefreq>: Specify the change frequency (if applicable). Options include always, hourly, daily, weekly, monthly, yearly, or never.
- <priority>: Assign a priority between 0.0 and 1.0 (optional) to indicate the page’s importance within your site.
Complete the XML Document:
You can add as many URLs as you want to your sitemap. Just click the small + next to an existing entry and enter a new URL, then continue adding all the URLs you wish to include in your sitemap.
Validate Your Sitemap:
Before you upload your XML sitemap, it’s essential to ensure that it’s correctly formatted. You can use several tools to check for any syntax errors and ensure that the entire file is valid. You can use XML validators to check for errors before submitting your sitemap URL to Google.
Save and Name the XML File:
Save your sitemap as an XML file to be submitted to search engines. The file should be named “sitemap.xml” and saved in the root directory of your website.
Submit to Search Engines:
To make search engines aware of your sitemap, access webmaster tools provided by major search engines like Google Search Console and Bing Webmaster Tools. Submit your XML sitemap file through their respective interfaces. This helps popularize your website and makes it easier for a crawler to find your website’s relevant pages to crawl and index them.
Monitor and Update:
Sitemap files are critical to ensuring search engines can find the newest content on your website. When you make any changes to your website’s structure, it is a good habit to monitor your sitemap for errors and update it regularly.
How to Submit Your Sitemap through Google Search Console
Google Search Console is a valuable tool for webmasters and website owners. It allows you to submit your sitemap to Google, which is crucial in ensuring that Googlebot indexes your site effectively. Here’s a step-by-step guide on how to submit your sitemap through Google Search Console:
1. Sign in to Google Search Console:
Sign in to your Google Search Console account. If you still need to create one, sign in to your Google Account and select create an account. If you don’t have a Google account, you can create one using the same username and password you use with Gmail.
2. Select Your Property:
Once you have signed in, you need to give access to Google Search Console to add a new website. After signing in, you’ll need to add and verify your website as a property in Google Search Console. Once your property is set up, select it from the property list. Once you have added it, verify it by making sure that you see the website listed as verified under ‘Site Dashboard.’
3. Locate the Sitemaps Section:
Click “Sitemaps” in the left-hand menu to get to the sitemaps section. This page will display all of the sitemaps in your account and other information about your sitemaps.
4. Add Your Sitemap URL:
In the “Add a new sitemap” field, enter the URL of your sitemap. The sitemap URL will typically be in this format: https://www.yourwebsite.com/sitemap.xml. Make sure to replace “yourwebsite.com” with your actual domain.
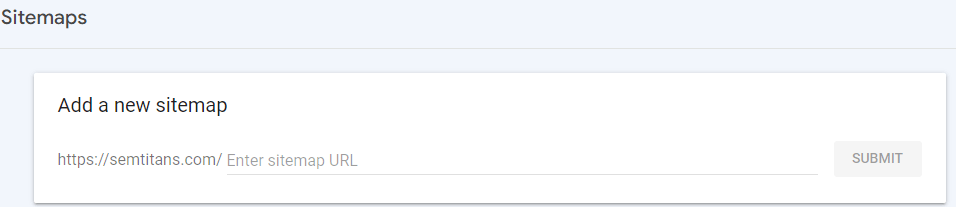
5. Submit the Sitemap:
After entering the sitemap URL, click the “Submit” button. Google Search Console will now fetch your sitemap and begin the indexing process. Depending on the size of your website, it may take some time for Google to crawl and index all your pages.
6. Monitor Sitemap Status:
You can track the status of your submitted sitemap in the “Sitemaps” section of Google Search Console. It will show you the number of submitted pages and how many have been indexed by Google. This data can help you ensure that all your important pages are being crawled and indexed.
7. Receive Notifications:
Google Search Console will also notify you of any issues it encounters while crawling your sitemap. Be sure to address and fix any errors to ensure smooth indexing.
8. Update Your Sitemap:
As your website evolves, make updates to your sitemap to reflect changes in your content. Submit an updated sitemap to Google Search Console whenever you make significant changes.
Final Thoughts
Creating and submitting your sitemap to Google Search Console is a fundamental step in optimizing your website’s visibility in Google’s search results. It helps ensure that your content is crawled, indexed, and displayed to users searching for relevant information. Regularly monitoring your sitemap’s status in Google Search Console allows you to maintain an up-to-date and well-indexed website.